Wednesday, June 15, 2011

Door Deliverance.

It's done. The front door is now dressed in head to toe glossy white numerology. Jeff and I (along with our 'helper' Rosemary) took on the vinyl address number application this morning while Miss Gloria dreamed of bottles and pacifiers. It turned out SO awesome...I'm in address number love.


Quite honestly, this was the most terrifying task to date. Being the obsessive compulsive perfectionist that I am, there was too much at stake for my liking with this project - namely, a crooked address. However, the process was made QUITE simple with the awesome step-by-step instructions that accompanied the decal along with a photo tutorial. Phewfda! The biggest thing is just taking your time, measuring once, twice, three times before you make the sticky commitment. Once it was on, the three of us went outside with our eyes closed, turned and basked in the glossy glow of our new address decal.


Just to give you an idea, the steps went something like this:
- Clean the area you'll be applying the decal with soapy water, rinse and then repeat using rubbing alcohol (to eliminate any residue on the surface).
- Measure, measure, measure until you find your perfect center and get things level.
- Stick it on and smooth it from the center out using a squeegie (I used the edge of a gift card)
- Peel the backing off ever so carefully
- ENJOY!
The whole process took about 10 minutes by the time my anal self got it just so and I'm pleased to say it couldn't get anymore level or centered if it tried. I think it adds a ton of sparkle to the door...definitely more than its $6 price tag. Here's a link to the Etsy shop I ordered the decal from: http://www.etsy.com/people/singlestory - Thanks Allison!

Another little diddy to share with you today - these napkin rings I picked up at a garage sale.


I LOOOOOOOOOOOOOOOOOVE them! They weren't exactly a steal (8 of them for $10)...but I truly think they are handmade. They are composed of a super thin, super flexible metal of some kind and have welding seams on the under side? Whoever made them, I love you AND your love of bows. Can't wait to actually have a table to set them on:-) More to come!

Tuesday, June 14, 2011

Address Numbers Revisited

I had high hopes to share the unveiling of the new address numbers on the front door tonight. However, due to the 5 hour long torrential down pour, I was unable to get the numbers adhered (should be squeaky clean and dry upon application). So, here's a little teaser of what arrived in the mail today care of Single Story on Etsy. Read back a few posts to hear more about the vinyl decal I had made for the door:-)


Until tomorrow when I hope to unveil the front door, I will tide you over with an image of a few other little detaily updates we made over the weekend. I referenced a particular address number font that I liked at Home Depot in a previous post. I decided to pick up the numbers to add a little 'fancy' to our garage. It's more common than not to post your address on the alley side of the garage for deliveries, etc here in the Mini Apple...so I thought this was a nice little addition to the facade.


We also went ahead and updated the hardware on the door we use to access our garage. Previously, it was simple brass and hardly enhanced the look of the otherwise plain landscape. So a simple Qwik Set deadbolt and knob paired with a set of $2 Home Depot hinges in an ORB finish meant a pretty spiffy looking door.

The best part about it is that the lock has "Smart Key" technology. It's a tad mind-boggling, but if you buy a lock that is noted as "Smart Key", you can manually key those locks to all use the same key. In other words, we were able to make it so a single key can open our front door, back door and garage door. How convenient! An added bonus is that if you were to ever lose your keys/have them stolen, you can simply re-key the locks yourself. Amazing, huh? The Smart Key technology extends through many different brands of locks as well. Our front door hardware and back door hardware are made by different companies, yet both can be keyed the same because of Smart Key. Three cheers for Smart Key!

I have my main design squeeze Jenn coming over this weekend to discuss the following:
- a paint color for the basement walls and trim
- suggestions of how to lay out furniture on main level and perhaps a few furniture selections
- window treatment ideas for main level

Can't wait to share her ideas with you! Until tomorrow, here's a shot of ONE of my absolute FAVORITE little girls:

Monday, June 13, 2011

Organization Station.

I've become much less motivated to update my blog as the brunt of the manual labor around here seems to have fallen on my shoulders. For the past 13 weeks, people have been here around the clock slaving over my hopes and dreams. Yet, for the past week, I've been working like a dog to get this place organized, cleared out of unnecessary items and cleaned. It seems with every room I tackle, the mess keeps getting larger and larger. With the kids flocking around me all day, I've had absolutely no rhyme or reason to my plan of attack...just do what I can whenever I get a moment.

In related news, I'm exhausted. Hauling boxes, sorting through lumber piles, unpacking everything in sight...eyeyeye. By the time we get the kids in bed and have a few uninterrupted hours to accomplish something, I'm too tired to do anything (but of course, I do anyway or nothing would ever get done!)


Now that I've whined for a good few hundred characters, let me get to what I actually HAVE accomplished. Anyone who knows me well knows I am an organizational FREAK. Nothing comes into my home without given an assigned spot for it to rest, be played with and returned to. Therefore, having been out of our house off and on for the past 4 months, combined with the fact that we never fully unpacked when we moved here with the intention of remodeling in the near future means unpacking has been a bear.


BUT, I am VERY pleased to say that most everything is completely unpacked and given a spot hidden from the naked eye (I'm a fan of keeping every and all surfaces CLEAR of clutter) and I STILL have cabinet room to spare. SCORE. This was so not the case pre-remodel and I left many belongings packed until I could actually find a spot for them. Speaking of spots, how cute are these floppy little totes I found at The Containter Store? Perfect for frequently used toys and easy to store in smaller spaces:


In addition to unpacking, I've been going through everything as I find a place for it. I have a pretty nice sized garage sale put together that I'm planning to host this Friday/Saturday.

I'm selling some really nice, brand-name pieces...many from Crate & Barrel or the like. It's not that I don't like them, it's that I don't use them and I'm tired of holding on to things that I don't put to use. I figure I'm better off getting a few bucks for them, sending them home with someone that will appreciate them and reinvesting in something we actually need (ahem, a COUCH!) So, getting those yard sale items out of the garage will free up on a ton of space in there as well. Win, win. We spent a good chunk of last weekend getting the garage cleaned out of all leftover building materials and trash.

It may not look like it, but we've come A LONG way!
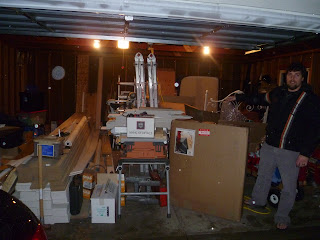

Over the past week, Jeff and I have really been talking on and on about what our plan is for the basement. At this point, it's the only untouched area in our home and frankly, it shows. While I would pinpoint the condition of the basement as 'finished' and 'original' and 'scary', it really is space that we should take advantage of.

We have plans drawn up for a full overhaul of the basement - adding a large bathroom, finishing off the laundry room and storage room, enclosing the mechanicals of the house and creating a petite but pleasant family room (drywall, recessed lighting, carpet, a built in or two)...we really feel like now is the time for us to stop putting money in this house. While we absolutely love the changes we've made and definitely see ourselves calling this place home for a while, we don't see ourselves here long term and want to retain our selling power should we up and decide it's time. A basement remodel would be a considerable investment and one that would hopefully prove to be beneficial in the long term. But there are no guarantees of that, especially if we planned to move in the next 10 years. So with all of that considered (and discussed on far too many occasions), we have decided to give the basement a tiny little facelift (more like a botox treatment) immediately. In fact, we are hoping to have it done while we are out of town next week. Here's what it will include:

- 2 generous coats of paint over the knotty pine paneling
- A few updated trim pieces to finish off a few exposed edges here and there
- 2 new ceiling mounted light fixtures
- New carpet

Whether or not we did a full overhaul of the basement or not, we have always intended for it to be a playroom for the kids. We will keep all the existing cabinets/closets/shelving that is built out already and give them a little pizaaz with a burst of color here and there. I am SO excited about this little refresher. Without it, the basement is pretty much unusable for us (read: scary). I wouldn't find myself down there 'playing' with it as is...I hardly doubt my two year old would feel differently. It will be great to have this ready before winter so the girls have a place to play during the endless months of hibernation.

Stay tuned for more news on the address numbers later today! It's my favorite time of year, PEONY season! Is anything more beautiful paired with white Carrera marble and a mini-pendant chandelier:

Friday, June 10, 2011

Contractor Highlight.

I'm still in this state of disbelief that the house is nearly finished. Not only because the house has been structurally altered, but because it's hard to believe almost 4 months have passed since we began the actual construction process...and 8 months since we first began planning for the changes to take place! The other thing about this project is how great we feel now that it's done. With our first major remodel, there were areas of the house that left much to be desired. In the end, it was beautiful, but I didn't feel like everything was done as perfectly as I wanted it to be (note that 'perfect' to me is definitely different than 'perfect' to another and I often tend to be hyper-perfectionistic to an annoying level). With that disclaimer made, I sometimes felt like the only way to feel our last project was d-o-n-e was to wash our hands of it completely. It was hard for me to look at the things I wanted to do differently in the house day after day. Having someone come look through our home with a fine tooth comb and ultimately decide they wanted it to be theirs gave me the satisfaction that we built the home for them to love. We loved that home dearly and learned so INCREDIBLY much from it, but we haven't looked back since the day we sold it.

This time, I sit and TRY and think of things that I would have done differently (if for no other reason than to learn from them or think of future possibilities). But in all honesty, I really don't feel we used a single contractor that didn't produce work to the level that hyper-sensitive me has come to expect. Daughter of a facial surgeon, I come from a long line of hyper-perfectionists...it pushes me to always do the absolute best I can, but also sends me spiraling to the land of never-never expectations. It is time for me to call out a few people who exceeded even my expectations. So with that, in the coming days/weeks, I will be featuring a few of these incredible peoples/companies in the Twin Cities. You will also see their names splashed across my Twin Cities Notables tab. Stay tuned for more on the following fine establishments:

Susan Nackers
Vivo Architecture

Jon Jorud
JYJ Construction

Keith Gilmore
Dakota Wood Design

Rick Bokusky
Sky Electric

I look forward to smothering them in compliments after all the wonderful feedback we've received on our project - as without them, none of this would have been possible!

Thursday, June 9, 2011

Ledgendary.

You've been hearing me talk about this marble ledge that runs the perimeter of our kitchen. I'm pleased to finally be here to share some preliminary photos with you.

This little ledge has been part of our kitchen design from the get-go. The idea behind it was two-fold: 1) Being that we have a small kitchen, this ledge would act as additional open storage for frequently used items and 2) Accommodating this roughly 6" deep ledge meant building the lower cabinets out an additional 6" from the wall making our lower cabinets uberly deep for even more storage convenience (30" deep vs the standard 24" deep).

The ledge is built out of two pieces of marble...an apron front and a top 'shelf' piece.

On the built-in-hutch-butler's-pantry whose cabinetry is the greenish gray color (Benjamin Moore Inner Balance), we decided to do a slab of white carrera marble as the counter.

Because we wanted this piece to feel different than the rest of the more functional part of the kitchen, we added an ogee edge to the marble counter to give it a more formal feel. When planning for the ledge, we decided to keep things consistent and so we ended up carrying the ogee edge along all of the marble surfaces, including the ledge. On the Butler's Pantry, the ledge also acts as the window sill...clever!


The ledge is still missing the final piece, which is the decorative wood brackets that will connect the ledge to the upper cabinetry. This will be the final detail of the kitchen that I believe will give it a really polished look. Imagine, in these two areas if you will, the decorative wood brackets extending from the underside of the cabinetry down to rest on the ledge:


There will be other brackets and more paneled details to fill up the wall space on the butler's pantry as well.

When I look at the kitchen, what pops to me is the number of layers in it. Layers of surface types, layers of lighting, layers of cabinetry, layers of color, layers of hardware. For it being such a small space, there really is a ton of interesting places for your eye to explore. I never could have come up with this kitchen...it's far too sophisticated for my pink and purple loving self. But I love it and feel glamorous just being in it. The brackets are slotted to be arriving next week. I can't WAIT to see them. Once they go in, I will paint the spaces between the brackets the trim color to make the drywall feel as though it's a paneled back to the continuing cabinetry. I shall leave you with a few last images of the ledge. You can notice that the marble slab backsplash also went in behind the stove. Until those brackets go in, I think it's looking rather random...but can't wait to see it as the finished product.


...and yes, I am having trouble parting with my little Gloria's 1st birthday party decorations. If I leave them up, she'll always be my baby;-)

Wednesday, June 8, 2011

Wallpaper Special

I'm sure you were in disbelief at how little I paid homage to the entryway wallpaper with the amount I've gone on about it for the past 6 months. It isn't that I'm not head over heels for it, but more that there's been SO MUCH to cover. As the day to day action around the house winds down, the details are shining through...and by shining, I mean just that. My favorite thing about the wallpaper is the sheen and the 3 dimensional look it gives the walls. Here's what I'm talking about:

Not only is the back of the paper a creamy, metallic ivory, but the gold accents are also sheeny. All that shine atop the dominatingly matte whimsical painted flowers and birds equals wallpaper bliss. I captured a few more shots of it with the light streaming in through the front door this afternoon. What a statement this little entryway makes despite how tiny and insignificant it is.


This wallpaper is by Designers Guild, pattern is called Whitewell and color is Champagne. I ordered it through Hirschfields in Edina. Because it comes from Europe, shipping is pricey and there really isn't any way around it. But, I'd fly it here again just to wake up to it every morning:-)

Address Numbers.

For some reason, I'm super picky about address numbers on my exterior. I have no idea why, but they seem to be one of the last things I get around to adding on the house at the end of the project - very cherry on the topish. I'm not opposed to a simple metal house number, and actually, Home Depot has a font that I quite like. However, I saw a vinyl decal on an HGTV episode of Sarah's House and fell in love. I can't find an image of it, but the address was spelled out (Fifty Four instead of 54) which I found rather charming. I had planned to do it on the fascia board of the front overhang. Unfortunately, once all the trim went up on it, the actual available flat space became too squat to fit our big beautiful address on it. Then I came across this image via Pinterest and decided to go this route.

I thought about collaborating with my dear friend @terbraun who knows all things graphics and design to create one. But then I stumbled upon the Etsy shop 'Single Story' that actually custom makes them...and you'll never guess the price...$6! So I have placed my order for vinyl numbers in a white gloss finish (predicted to last outdoors about 5 years...however, being that our door is under an overhang...I'm thinking even longer?) So exciting! I plan to put them on the flat portion of our front door right beneath the glass but above the raised panel.

Stay tuned!